Patellar Tendonitis
Patellar Tendonitis
Patellar tendinitis is characterized by inflammation and pain at the patellar tendon (the tendon below the kneecap). This structure is the tendon attachment of the quadriceps (thigh) muscles to the leg, which is important in straightening the knee or slowing the knee during bending or squatting. Patellar Tendonitis is typically a grade 1 or 2 strain of the tendon. A grade 1 strain is a mild strain. There is a slight pull without obvious tearing (referred to as microscopic tendon tearing). There is no loss of strength, and the tendon is the correct length. A grade 2 strain is a moderate strain, which involves tearing of tendon fibers within the substance of the tendon or at the bone-tendon junction. The length of the tendon is usually increased, and there is decreased strength. A grade 3 strain is a complete rupture of the tendon.
Anatomy and Pathology
The patellar tendon originates from the anterior aspect of the extensor hood, inferior to the patellar apex. The distal portion of the patellar tendon inserts on the tibial tubercle. The patellar tendon is a monotonous band of fibrocartilaginous tissue.3 Though Jumper’s Knee was once referred to as patellar tendonitis, it is now well established in histopathologically and biochemically analyzed tissue samples excised from the patellar tendons of patients with acute symptoms of Jumper’s Knee that inflammatory cellular infiltrates are absent.4,7 This confirms that the mechanism of disease in Jumper’s Knee is that of a degenerative tendinopathy (tendinosis)5,6 rather than that of an inflammatory tendinitis. In the setting of patellar tendinopathy associated with jumper’s knee, the area of abnormal signal intensity on MRI corresponds to a region of tenocyte hyperplasia, angiofibroblastic tendinosis, loss of coherent collagenous architecture and microtears.4 With more advanced disease, macrotears and frank discontinuity may ensue. Rarely, an avulsion fracture at the apical patellar enthesis may be found.
Clinical Diagnosis
Patellar tendinosis may be classified into four stages of injury. They are as follows:
Stage 1: Pain after activity, without functional impairment
Stage 2:
- Pain at beginning of activity
- Pain disappears after warm-up and reappears with fatigue, but still able to perform satisfactorily
Stage 3:
- Pain during and after activity that impairs function
- Patient unable to participate in sports at their prior level
Stage 4: Complete tendon rupture requiring surgical repair
To evaluate for the presence of injury, the following test can be conducted:
Ask the patient to lie on unaffected side on a treatment table.
Passively flex the patient’s knee.
A positive sign for jumper’s knee is present if the patient feels pain at 120 degrees passive knee flexion or anytime during resisted knee extension.
Common Signs & Symptoms of Patellar Tendonitis
- Pain, tenderness, swelling, warmth, or redness over the patellar tendon, most often at the lower pole of the patella (kneecap) or at the tibial tubercle (bump on the upper part of the lower leg)
- Pain and loss of strength (occasionally) with forcefully straightening the knee (especially when jumping or when rising from a seated or squatting position) or bending the knee completely (squatting or kneeling)
- Crepitation (a crackling sound) when the tendon is moved or touched
MRI Evaluation
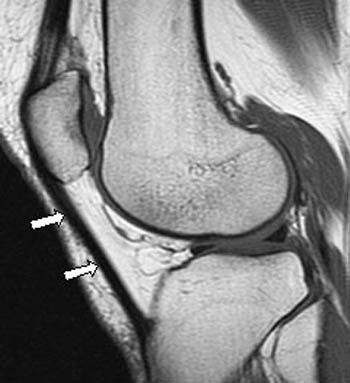
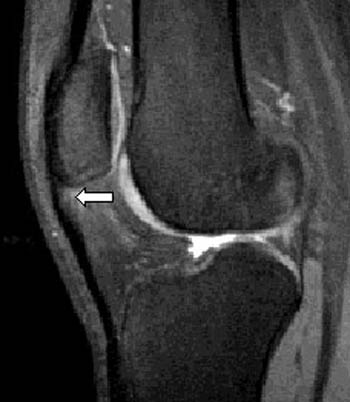
The ability of MRI to acquire multiplanar images, in concert with its high soft tissue contrast, makes MR imaging the most effective diagnostic modality in the evaluation of Jumper’s Knee. T1, proton density and/or T2-weighted sagittal and axial sequences are employed to evaluate the patellar tendon. Coronal sequences are of limited value due to volume averaging artifacts and the non-orthogonal slice orientation. On MR images, the normal patellar tendon demonstrates homogenous low signal intensity (4a). Exceptions to this rule occur proximally, where the posterior margin of the tendon may show thin, linear, intermediate signal intensity striations, and distally, where mildly increased signal intensity may be noted at the triangle proximal to the tibial tubercle enthesis. A normal patellar tendon should not exceed 7mm in AP diameter.4,9 The tendon is semilunar to half round in geometry, with a convex anterior border. A constant feature is that of a well-defined posterior border (5a).
 4
4 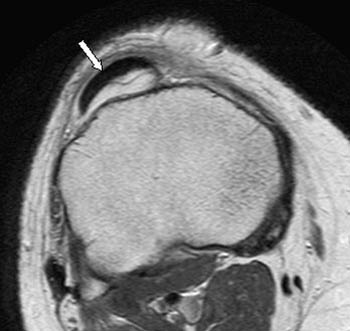 5
5 With Jumper’s Knee, the most reliable MRI finding is focal proximal 3rd tendon thickening with an associated increase in AP diameter greater than 7mm.9 Focal T2 hyperintensity within the proximal tendon is most commonly seen involving the medial one-third of the tendon (6a),4 and may extend to involve the central third of the tendon. Mild, subtle tendonopathy may not affect the entire A-P diameter of patellar tendon (7a). More severe tendinopathy demonstrates full thickness involvement by intrasubstance signal and T2 hyperintensity (8a,8b). In addition, an indistinct posterior tendon border may also be seen. Edema may be present within the adjacent Hoffa’s fat pad, with irregular T2 hyperintensity replacing normal fat signal. Partial thickness (9a,10a) and complete tears may also occur (11a,11b).
 6
6 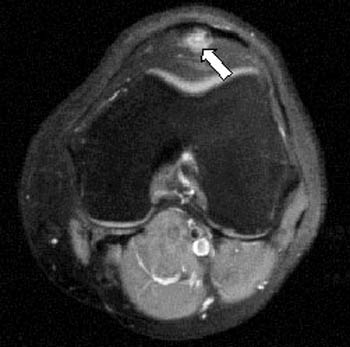 7
7  8a
8a 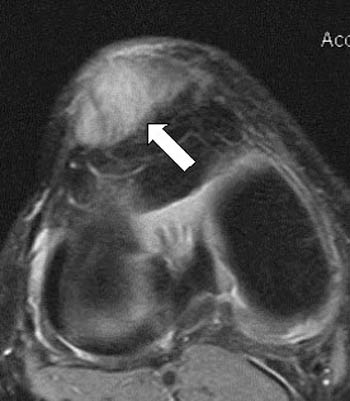 8b
8b 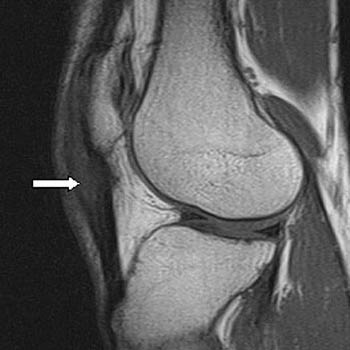 9
9  10
10 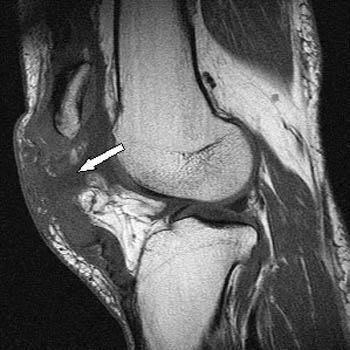 11a
11a 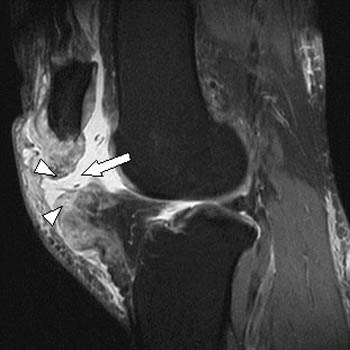 11b
11b
Patellar Tendonitis Causes
- Strain from a sudden increase in amount or intensity of activity or overuse of the quadriceps muscles
and patellar tendon
- Direct blow or injury to the knee or patellar tendon
Patellar Tendonitis Risk Increases With:
- Sports that require sudden, explosive quadriceps contraction (jumping, quick starts, or kicking)
- Running sports, especially running down hills
- Poor physical conditioning (strength and flexibility, such as with weak quadriceps or tight hamstrings)
- Flat feet
Patellar Tendonitis Preventive Measures
- Appropriately warm up and stretch before practice or competition
- Allow time for adequate rest and recovery between practices and competition
- Maintain appropriate conditioning:
- Cardiovascular fitness
- Thigh and knee strength
- Flexibility and endurance
- To help prevent recurrence, taping, protective strapping or bracing, or an adhesive bandage may be needed for several weeks after healing is complete
- Wear arch supports (orthotics)
Expected Outcome
- Patellar Tendonitis is usually curable within 6 weeks if treated appropriately with conservative treatment and resting of the affected area.
Possible Complications
- Prolonged healing time if not appropriately treated or if not given adequate time to heal
- Recurrence of symptoms if activity is resumed too soon, with overuse, with a direct blow, or when using poor technique
- Untreated, tendon rupture requiring surgery
Possible Complications
-
Eccentric Quadriceps and Patellar Tendon Exercises
- https://www.youtube.com/watch?v=W4f3v42n-EQ
- http://bjsm.bmj.com/content/bjsports/39/11/847.full.pdf
- https://www.youtube.com/watch?v=FcTYXWStIM4
- https://www.youtube.com/watch?v=K1-LibsbxWY
- https://www.youtube.com/watch?v=Bhgxor2vP7U
- Recurrence of symptoms if activity is resumed too soon, with overuse, with a direct blow, or when using poor technique
- Untreated, tendon rupture requiring surger
- Quad Stretches
-
The Eccentric Exercise Protocol
for Chronic Patellar
Tendinopathy
http://eccentric-exercises.blogspot.com.au/2007/12/my-eccentric-exercise-protocol.html
Wednesday, December 26, 2007
MY ECCENTRIC EXERCISE PROTOCOL
 I describe my eccentric exercise protocol below. I developed it through trial-and-error over the past 1-2 years. It is what has worked for me to eliminate knee pain related to longstanding patellar tendinopathy.
Unlike prior eccentric exercise protocols I experimented with, this protocol has not led to relapses in my knee pain. Through trial-and-error, I discovered that if too much weight is added too soon, eccentric exercises can lead to flare-ups in symptoms, particularly increased pain. So, I caution anyone who embarks on eccentric exercises to use a proper protocol. Furthermore, I highly recommend that prior to starting eccentric exercises that you consult an appropriate medical specialist and a good physical therapist.
The exercises should not be done in the early stages when one still has inflammation. They are recommended once the inflammation of tendinitis has gone away, but the pain remains.
I developed my protocol after reviewing the medical literature on using eccentric exercise to treat patellar tendinopathy. However, the articles in most cases were not very precise on the exact protocols used and left out some important details. I had to fill in the details through my own trial-and-error over the past couple of years. In late 2005 I started on my first self-designed program of eccentric exercises. However, after a number of weeks of doing the exercises, my pain increased and I stopped doing the exercises. Then, in mid-2006, I started my second program of eccentric exercise, but my pain started to increase again after a month and I again temporarily stopped the exercises. During the first few weeks of the two programs, the exercises seemed to somewhat reduce my daily knee pain. However, as I continued to add weights in each case, I eventually ran into problems. While I did not have more-than-usual knee pain doing the exercises, my pain began to increase significantly during the day in the following 1-3 days just before stopping the programs. I was determined to come up with a protocol that would not lead to a relapse.
As I look back on my data from the first two programs, I firmly believe the problem was that I added weight to the backpack too quickly. So, the protocol I now use corrects this problem. 
These are key aspects to the protocol that has worked for me:
— I do the exercises ONCE a day and AT NIGHT before going to bed. I discovered that when I did the exercises in the morning, I had greater, annoying knee pain during the day. However, when I did the exercises before going to bed, the tendon and surrounding muscles had time to rest over night. I do not endorse protocols that call for doing the exercise in the morning. I also do not believe the exercise needs to be done twice a day to be effective.
— For the first 2 months, I did the eccentrics on the slant board without using any weights in a backpack.
— For the first two weeks, I used BOTH legs together to do the eccentric squats. I ramped up from 1 set of 10 repetitions to 3 sets of 15 repetitions over that period. By squating with both legs at the same time, you will be putting much less force on the bad knee compared to doing a single-leg squat.
— After that, I stopped the two-leg squats and began performing one-leg squats (i.e., performing squats with the bad-knee leg.) I began with 10 repetitions and added only 1 or 2 repetitions per day. When I built up to 45 repetitions over four weeks, I stayed at 45 repetitions for another couple of weeks. Again, all of this was without any weights in a backpack. (Every 15 repetitions I considered a set. I usually took a 5-20 second break between each set.)
— When doing the one-legged squats, I’d recommend the following, which is not shown in the video, and which was not part of my original protocol. It will help you to focus more of your bad leg’s energy on the eccentric portion of the movement, and less on the concentric part: Once You Are At The Bottom Of The One-Legged Squat (In Other Words, The Point Of Maximum Squat, Just When You Are About To Return Up To Standing) Come Up To Standing With BOTH Legs.
— During month 3, I introduced weights into a backpack that I wore while doing the eccentric exercises on the slant board. I started with 1/2 pound. Then, every 4 days I would add another 1/2 pound into the backpack. (1/2 pounds weights can be obtained from ankle weights that use 1/2-pound inserts.) THIS STEP IS VERY IMPORTANT. IT IS WHAT CAN MAKE THE DIFFERENCE BETWEEN HAVING SUCCESS OR FAILURE WITH ECCENTRIC EXERCISE. Weight must be added S-L-O-W-L-Y over time.
— There will be the temptation to add weights more quickly. DON’T DO IT. You may find that in the early weeks of doing the eccentric exercises they are helping to reduce pain. You may believe that you can add weights at a faster pace because of this improvement. Through trial-and-error, I learned the hard way not to add weights any faster than 1/2 pound every 4 days. After a period of time, after adding weights, if you find your pain rising in the four days after increasing the weight increment, I would not increase weight further. You may need to stop altogether or for a few days or a week or more. You may need to reduce weight in the backpack. When you resume, you may need to stay on the same weight for more than 4 days.
— Even if your pain is not rising in the days after adding weight to the backpack, you may still decide to hold off adding weight for more than 4 days if you are not absolutely comfortable with adding additional weight. For example, when I got to 15 pounds, I stayed at that level for 8 days before I went to 15 1/2 pounds. I wanted to be able to do the 45th repetition at 15 pounds fairly easily before proceeding to 15 1/2 pounds.
Please double click the forward button to start video:
— Weights should continue to be added over time at the same rate described. It is not clear what the upper limit of weights should be, however. A number of research protocols seem to suggest 20-25 pounds as a possible upper limit. However, the upper limit will likely be different for each person depending on a variety of factors — age, general health, one’s own weight, general physical abilities, etc… I believe one will be able to see improvement well before getting to 20 pounds, however, and I cannot say I endorse going all the way to 20 pounds. It is very possible that for some people 10 pounds (or less) may be as far as you should go. It is also not clear when to stop the exercises altogether. A number of research protocols suggest that after a period of months of doing the exercises every day that the exercises be continued for another year, but not necessarily each day. This is one part of my protocol that is not yet nailed down.
— The slant board I use has roughly a 25-degree angle. (If you have a slant board with less angulation, you can increase it with a thin piece of wood. But you would need to review some trigonometry so you don’t raise the angle too much!)
— I DO NOT subscribe to those protocols that say you should experience higher-than-typical pain while doing the eccentric exercise. If you have significantly more pain while doing the exercise, you should stop. You may have ramped up your weights or reps too fast in prior days. You should take off a couple of days from the eccentrics and consult with your physical therapist and/or doctor.
— I attempted to do the eccentric exercises every day. However, there were times when I had a bad cold, or my pain was temporarily elevated, or I was away from home. On average, I took off 1 day out of every 18 days.
— IT IS VERY IMPORTANT TO KEEP A DAILY LOG BOOK. The log book should include the number of repetitions and the amount of weight being used that day. Additional information, such as your pain score on a scale from 0 to 10 and other notes can be added.
— I generally tried to limit other kinds of exercise when doing the eccentric protocol. On occasion, I did go bicycling. However, when bicycling I used very easy gears, a higher cadence, and avoided hills. For the first 2-4 months, I’d limit significant exercise. (If you swim, I’d avoid the breaststroke.)
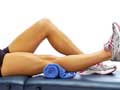
— I stretch on a daily basis. After doing the eccentric exercise each day, I also roll my IT-band and quadriceps on a “foam roller.”
— I do not apply ice after doing the eccentric exercises. (In my first two programs of eccentric exercise I religiously iced, but did not do so for the protocol described here after I determined that icing may not have been providing any benefit.)
— I set up my slant board with chairs or other large objects to the left and right of the slant board. This is so I could lightly brush my hands against these objects to maintain balance while doing the eccentric exercises. It is important to maintain balance while doing the exercises. However, I did not want to hold firmly to any object given that it could have negated the effects of the weight in the backpack. So, I maintained my balance by lightly brushing my hands against objects on either side of the slant board.
— Once on the slant board, I squat down to a count of 2 to 3, and then rise up from the squat more quickly. It is the downward part of the exercise that is the eccentric phase. The move back up should be steady and smooth, not explosive.
— A number of medical journals use a 12-week protocol. However, my protocol is at least twice as long. Through trial-and-error I found that doing too much too soon can lead to relapses, which will ultimately lead to needing to take time off before starting again. If there is a relapse, then the total time required may be substantially longer.
— To remind oneself to do the exercises, place a note by your bed.
Stretching exercises
Patellar Tendonitis Symptoms
Symptoms of patellar tendonitis largely involve pain and tenderness in the area surrounding the kneecap. Any activity that places additional stress on the kneecap, like squatting or kneeling,l produce more severe pain. If untreated, these signs of patellar tendonitis will only grow worse and will begin to interfere with normal activities like climbing stairs.
Understanding how to heal patellar tendonitis begins by differentiating between the acute and chronic forms of the injury.
-
Acute Patellar Tendonitis
Acute patellar tendonitis results from a single accident or incident, causing symptoms almost immediately. Acute cases are most common in athletes.
-
Chronic Patellar Tendonitis
The chronic form of the condition may be easy to overlook, as symptoms develop gradually, allowing the patient to continue regular activity, causing further damage. If untreated, chronic patellar tendonitis will develop symptoms as severe as its acute counterpart.
Patellar Tendonitis Treatment
Treatment for patellar tendonitis can focus on treating immediate pain or addressing the underlying cause. By approaching the problem from both sides, you will both heal your patellar tendonitis and enjoy a manageable recovery process.
The best treatment for patellar tendonitis in the short term is simple rest. Short-term pain relief is important to your daily life, before finding a long-term cure for patellar tendonitis. Avoiding heavy physical activity will allow the tendons to repair themselves in a matter of days or weeks. Boost the effectiveness of this patellar tendonitis cure by incorporating hot and cold therapy and reducing swelling with patellar tendonitis taping or a compression sleeve.
 Compression sleeves reduce inflammation and improve circulation to encourage healing. ( See Product)
Once your immediate symptoms are under control, explore long-term solutions for treating patellar tendonitis:
Patellar Tendonitis Exercises
Exercises for patellar tendonitis in the knee are one way to strengthen muscles for a faster and healthier recovery process. In addition to speeding recovery, physical therapy for patellar tendonitis will protect against future injury.
Adjust the intensity of the patellar tendonitis stretches below to fit your own needs and limitations. Pushing yourself too hard can worsten the condition, leaving you in a worse place than when you started.
Speak to your doctor before attempting the following stretches for patellar tendonitis.
-
Calf Stretch
Stand about 18 inches from a wall. Take one step forward with your uninjured leg and place both palms flat on the wall. From this position, lean forward and bend your injured leg slightly until you feel a stretch in your calf.
-
Quad Stretch
The quads are essential to a functioning knee joint, which makes quad stretches key patellar tendonitis physical therapy exercises. Standing, bend your injured leg at the knee. Use your hand to pull the ankle upward toward your hips, stabilize yourself against a wall if necessary. Lean forward to stretch the muscle. You should feel a slight burning sensation in your upper leg.
-
Hamstring Stretch
The hamstring is one of the most commonly injured leg muscles, so hamstring stretches are a crucial part of your patellar tendonitis recovery exercise regimen. Stand and lean forward to touch your toes while keeping your knees locked. Reach down as far as you are able.
-
Eccentric Exercises for Patellar Tendonitis
The best physical therapy exercises for patellar tendonitis include a fair share of eccentric training. Begin in a standing position, using a slant board if you have one available. Perform an eccentric decline squat by extending your uninjured leg forward and squatting slowly on your injured leg. Use a wall or chair for support if necessary. Return to standing position, and repeat 5 to 10 times.
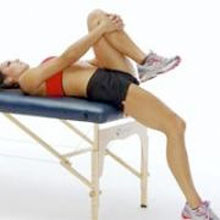
Testing flexibility – A good place to start is testing the flexibility of the hip flexor and quadriceps muscles. This can be tested by performing the Thomas test.
Sit on the end of a couch and pull the knee up to your chest. Holding this position, lay back onto the couch. The thigh of the free leg should be horizontal. If it rides up, this indicates possible tight hip flexor muscles (Rectus femoris or Iliopsoas). The shin of the free leg should hang vertically. If not then this may indicate tight Quadriceps muscles.
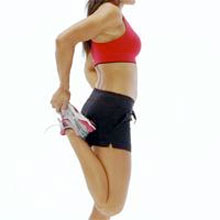
Quadriceps stretch – The quads can be stretched in either the standing or laying position. In standing you can hold onto something for balance if you need to or try holding your ear with the opposite arm. Aim to keep the knees together and pull the leg up straight not twisted. You should feel a stretch at the front of the leg which should not be painful. In the early acute stages of treatment hold stretches for around 10 seconds. Later on when the inflammation has gone stretches should be held for around 30 seconds. Repeat 3 times and stretch at least 3 times a day.
Play quadriceps muscle stretch video.
Hip flexor stretch – This exercise stretches the iliopsoas muscle and rectus remoris. Place one knee on the floor and the other foot out in front with the knee bent. Be careful to use on a mat or padding under the painful knee so at not to aggravate the injury. Push your hips forwards and keep your back upright. You should feel a stretch at the front of the hip and upper thigh. Hold for 10-30 seconds. Repeat 3 times and stretch at least 3 times a day. This exercise stretches the Rectus Femoris and Iliopsoas muscles which flex the hip. Be careful if lifting the leg up leaving only the knee on the floor. If it is painful at the knee do not do it. Ensure there is plenty of padding to avoid injuring the knee.
Strengthening exercises
Strengthening exercises are a very effective part of healing patella tendinopathy or jumpers knee. But knowing which exercises to do and when to do them is essential.
Strengthening exercises should begin as soon as pain allows and be gradually progressed over a period of 6 months or more. Exercises can be separated into three phases. As a guide phase 1 lasts for the first 3 months of rehabilitation and here the aim is to increase the strength and strength endurance. Phase 2, from 3 months to 6 months can begin to increase the power and speed endurance and from 6 months onwards more sports specific rehabilitation is appropriate.
It is likely that even the more serious patella tendon injuries can begin with isometric or static contractions of the quadriceps muscles. Strengthening for the calf raises is also important and can be done without much strain on the patella tendon at all. The athlete should progress to single leg eccentric squat exercises as soon as possible. Applying ice or cold therapy after performing the exercises can help avoid any pain and inflammation.
Isometric quad contractions – this exercise is likely to be possible very early in the rehabilitation program. The athlete contracts the quadriceps muscles, holds for a few seconds and relaxes. This can be done in the standing position, seated or lying face up or face down, whatever is most comfortable although standing is probably more relevant.
Initially begin with 3 sets of 8 repetitions holding for 5 seconds and build up to 4 sets of 12 repetitions holding for 10 seconds. If it is painful during, after or the next day then reduce the load. Athletes with good quadriceps bulk should aim to progress onto single leg eccentric squats as soon as possible.
Play isometric quadriceps exercise video.

Single leg extension – the leg extension machine can be used to strengthen the quadriceps muscles if doing full weight bearing exercises is still painful. It is a step on from isometric exercises but not likely to trigger the same kind of pain that single leg drop squats may.
Begin with 3 sets of 10 repetitions with light resistance concentrating on the last few degrees of motion as the leg straightens as this is the range of motion which works the vastus medialis on the inside of the knee more. Do no more on the good leg than you are able to do on the injured leg. Gradually increase the resistance when 3 sets of 10 or 12 reps become comfortable. Progress to single leg eccentric squats as soon as pain allows.
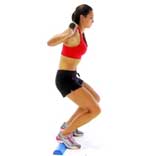
Eccentric squats – this is probably the most important exercise to get right in the treatment of chronic patella tendinopathy. The athlete can begin with double leg squats but should pregress as soon as possible onto single leg squats.
The exercise is performed by squatting down very slowly and more quickly up. Try to use the good leg to aid the upwards movement rather than load the injured knee. The aim is to load the tendon and muscle eccentrically which happens on the downwards phase of the squat. When performing single leg eccentric squats both legs can be used during the upwards phase so the load is purely concentrated on the eccentric or downwards phase.
Eccentric squat exercises can be performed on a slant board or with a half foam roller to raise the heels. This has the effect of reducing the element that the calf muscles contribute to the exercise and increasing the load on the quadriceps muscles.
Begin with 3 x 10 repetitions each day and gradually increase to 3 x 15 repetitions before increasing the load or weight. Stick with a particular load level until they can be done very comfortably. If any pain is felt during, after or the next day then take a step back. Applying ice after can help with pain and inflammation.
Play eccentric squat video (double leg only demonstrated here)..
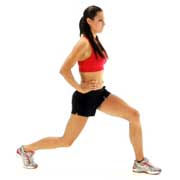
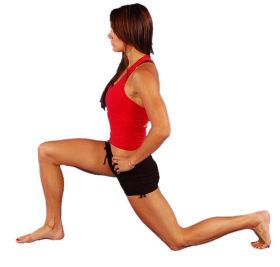
Lunge – the lunge exercise should begin as soon as pain allows and is a more demanding exercise which brings increasing power and speed into the exercise. It is more likely this exercise will be introduced around 3 months into the rehab program but each athlete will be different.
The athlete stands with one leg in front of the other and bends the front knee so the thigh is horizontal while the back knee goes towards the floor. This can be made easier by not going quite so low with the front leg. Begin with 1 set of 8 repetitions building to 3 sets of 15 reps. A weights bar across the shoulders can be used to increase the load.
Play lunge exercise video.
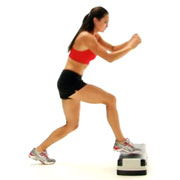
Step back exercise – this exercise is more suitable for the later stages of rehabilitation when the athlete is attempting to return to more specific sports training. The athlete steps back and then in one movement steps back onto the step. This is a more explosive, plyometric exercise related to the specific demands of sport. It works the calf muscle eccentrically as well as the knee during the stepping back phase and plyometrically as they push off.
Alternate so both legs are exercised and do not do any more on the good leg than you can achieve with the injured leg.
Play step back calf rehab exercise video.
Eccentric exercises
There has been a lot of published work on the benefit of eccentric exercises and in my practice I have seen significant benefits to the athletes I treat.
The key to the rationale behind eccentric drills is that they are the best way of promoting tendon remodelling: the regrowth and reordering of collagen tissue in place of the oedematous (fluid filled) degenerative tissue typical of tendinosis.
The athlete needs to be taught eccentric exercises (See table 1). A 45-degree slope is required and (at a later stage) a weights bar. Initially the athlete stands straight on the slope, then flexes his/her knees to 90 degrees, returning to a straight position again (see illustration below left).
| Stage | Exercise | No of legs |
|---|---|---|
| 1 | Two legs, 90 degree squat, no slope | 2 |
| 2 | Two legs, 90 degree squat on 45 degree slope | 2 |
| 3 | Single leg for squat phase (eccentric); two legs return phase (concentric), on slope |
1.5 |
| 4 | 10kg bar; single leg for squat phase, two legs return, on slope |
1.5 |
| 5 | Single leg only throughout, on slope | 1 |
The movement down must be done slowly (to a count of three) and the return can be done quickly (to a count of one). When away from home the slope can be replaced by the edge of a curb or step so that opportunities can be taken whenever possible to do the drills.
The number of repetitions is determined by the amount of discomfort felt in the patellar tendon. I advise athletes to stop a sequence of repetitions when they perceive an ache in the patellar tendon of 3/10, using the scale described above. The rationale for this is to stimulate the patellar tendon eccentrically to a fixed (symptomatic) level each day, but without such a high score as to produce pain and further damage. I suggest to athletes that they can do these repetitions as often as possible every day and many achieve the repetitions two to four times a day.
The exercise sequence can be progressed as shown in table 1. For some athletes stage 1 is too easy and they cannot bring on any discomfort in the patellar tendon. For others, the ratelimiting factor is quadriceps fatigue and for this reason they can use two legs in returning to the standing position (see stages 2 to 4).
As the stages progress the athlete will be able to increase the number of repetitions they can perform before the symptoms come on at a discomfort level of 3/10. There will be some days when the athlete can manage more repetitions than others, but normally they will be able to move on to the next stage after two to four weeks – so improvement in this condition is usually measured in months, not weeks.
The rate of progression will vary from athlete to athlete, dependent in large part on how often they perform the exercises. If more pain occurs in the tendon, the athlete should be advised to rest for two to three days and then drop back one stage in the rehab exercise progression.
Other rehab considerations
Alongside the eccentric exercises, it is important to address other possible contributory factors, such as:
- quadriceps and hip flexor tightness
- stiffness in the mid-lumbar spine
- discrepancies in leg length.